FE 'tkGooies' System

'IMAGE animations'
group

A Tk GUI to
Simulate
Brownian Motion

in an Animation

(two dimensional)

(FE = Freedom Environment)

FE 'tkGooie' interface for
simulation of 2D
Brownian motion
---
with choice of 2 colors
--- for the particle
path and for the
background
---
and with animation
start and stop
radiobuttons

FE Home Page > FE Downloads Page >

FE 'tkGooies' Description Page >

FE 'tkGooies' 'IMAGEanimations' Page >

This
'Brownian Motion Simulation - a 2D Animation'
tkGooie Page

INTRODUCTION to
Tcl-Tk Code for a GUI to simulate
'2D Brownian Motion - an Animation'

For about a year now (circa 2015), I have been planning to make a Tk GUI that performs an image animation of Brownian motion, in two dimensions --- an approximation of the apparently random motions of a small particle in a liquid.

I was motivated to do this by seeing images like the following in various math and physics books that I had been reading around 2010 through 2015 --- for example, pages 253-255 of the book 'Great Calculations' by Colin Pask, published in 2015.


Three tracings of the motion of colloidal particles of
radius 0.53 µm, as seen under the microscope, are displayed.
Successive positions every 30 seconds are joined by straight
line segments. (The mesh size is 3.2 µm.)

Reproduced from Jean Baptiste Perrin, "Mouvement brownien et
réalité moléculaire," Ann. de Chimie et de Physique (VIII) 18, 5-114, 1909
(A slightly different version appeared in the book 'Les Atomes'.)

In the book by Colin Pask, he points out that in a famous paper of 1905 (and another in 1906), Einstein took into account osmotic forces and diffusion in coming up with results that included a formula involving temperature, the gas constant R, the liquid's coefficient of viscosity, Avogadro's number N, and the radius of the particle undergoing motion.

Einstein used these physical factors to determine a "Formula for the Mean Displacement of Suspended Particles" and "A New Method of Determining the True Size of Atoms".

My goal is much less ambitious. Rather than involving physical properties like these, I simply wanted to generate --- in an animation, rather than via a static image --- an approximation to 2D Brownian motion.

    (However, someday I may return to this code and try to enhance it to bring into play various physical properties.)

If you want more information on Brownian motion, you can see a Wikipedia page on Brownian Motion or do a WEB SEARCH on the keywords 'brownian motion'.

Furthermore, Pask gives references to many authors of works on Brownian motion and Einstein --- authors such as Pais, Rigden, Newburgh, Peidle, Rueckner, and Feynman.

Other than making an animation of the motion, there were some other reasons why I wanted to make this image animation, including:

  • I plan to make an 'AudioVisualizer' someday via a Tcl-Tk script. This planned visualizer is to be driven by audio input --- OR other types of varying input, such as activity from a network-interface card or by monitoring CPU-activity.

    Making a 'visualizer' for any of these types of activity would require generating some rather complex images at a rather fast 'frame-rate'.

    I could use this 'create (colored) line segments' animation to help determine what I might need to do to generate fairly complex 'create line' images at approximately 20 frames per second.

  • I am a math, physics, and other sciences aficionado who likes to use Tcl-Tk to make math-physics-science topics easier to visualize and explore.

    This 'app' is an 'arrow' that I would like to add to that 'quiver' of tools.

  • Even if this 'app' does not have much scientific value, I may find use for it as a decorative-image-generator.

    Since this animation is rather 'pseudo-scientific', I plan to, initially, implement this 'app' in an 'IMAGEanimations' sub-menu of the 'IMAGEtools' menu of the FE 'tkGooies' system --- rather than in a 'MATHtools' menu or a 'PHYSICStools' menu.

    That is, this 'app' might have more use as a maker of decorative image backgrounds, rather than as an elucidator of physical principles.

    However, this 'app' depends on a fair amount of mathematical manipulation, which makes it (or its code) a candidate for inclusion in the 'MATHed' (math education) sub-menu of the 'MATHtools' menu of the 'tkGooies' system.

      (A 'Help' button on the GUI can be used to explain the math and code involved.)

These were more than enough reasons to motivate me to get started in coding this Tk script.


Basic Goals of the Tk Script:

My purpose for this Tk GUI script is/was to generate an animation of 2D motion that looks like Brownian motion of a small particle.

The animation is to be shown in a rectangular image area on a rectangular Tk 'canvas' widget.

A sequence of locations of the particle are to be computed using the Tcl 'rand' (random) function.

The sequence of locations are to be connected by straight line segments in the rectangular image area.


Assembling the pieces   (The GUI)

Now it was a matter of putting the pieces together.

I took 'code-pieces' from some of my other Tk scripts that 'draw' in an image area on a Tk canvas.

I ended up with the following GUI as an initial display.

Note that I have provided two color buttons on the GUI so that the user can control the background color of the image area and the color of the lines being drawn on that background color.

I also provided a line of several 'scale' widgets by which to control

  • the speed at which the line-segments are drawn (actually, the 'wait time' between drawing each line segment)

  • the maximum length of each line segment (in terms of a percent of the width of the image area)

  • the width (thickness) of the line segments (in pixels)

In addition, the user is provided two 'scale' widgets by which to precisely control the size of the image area (width and height in pixels).

By default, the GUI starts with a square image area, but the user can change the 'aspect ratio' of the image area by using the y-scale widget.

If you take the hint in the message line of the initial GUI and simply click on the 'Start' radiobutton, the default settings are used and animation images like the following are generated.

For this animation, I changed the default 'wait time' of 500 milliseconds to zero milliseconds --- so that the drawing of the line segments proceeds at 'full speed'.

You can see from the message line that this script is capable of drawing about 480 line segments per second on the medium-powered desktop computer on which I generated this image.

Changing Animation Parameters (on the fly)

It turned out, happily, that many of the animation controls on this GUI will work even DURING the animation.

For example, you can change the line color and the line width during the course of an animation --- yielding an image like the following.

    (I added a Line-Width 'scale' widget to the GUI before running this animation.)

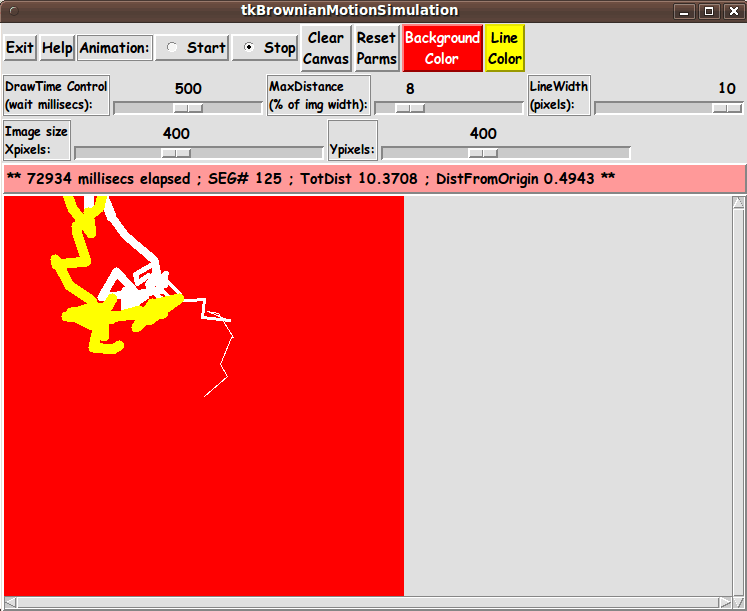
I changed the line width several times, and I changed the line color from white to yellow --- by using the Line-Width 'scale' widget and by using the Line-Color button.

In fact, this animation started with a black background.

At one point in the on-going animation, I clicked on the Background-Color button and changed the background to red.

Other 'on the fly' changes you can make:

  • You can click on the 'ClearCanvas' button at any time during the animation. The canvas will clear --- and then, line-segments will continue being drawn in the image area, starting from where the last line-segment was drawn.

  • You can change the 'wait time' --- to speed up or slow down the animation --- while the animation is running.

  • You can change the 'max distance' --- to allow longer line segments or restrict the length of the line segments --- during the animation.

Scrollable Canvas
(and big image area)

Note that the canvas in the GUI has vertical and horizontal scrollbars --- and you can set a large image area size with the x-and-y scale widgets --- and set a smaller 'MaxDistance' for max migration over each 'time-step'.

So you can set a very large image area in which the simulation can 'play out' --- and you can use the 'MaxDistance' parameter to keep the 'random walk' within the image area (for a major part of the simulation).

And if you think the max-pixels of the x-and-y scale widgets is not big enough for you, you can edit the Tk script and change the '-to' parameter on the two 'scale' widgets for the image size.

'Happy' Automatic Line-Clipping

Happily, the way that the 'canvas' widget and the 'create line' canvas command were implemented in the Tcl-Tk interpreter, there is no 'error thrown' whenever a line is drawn with one or both end-points outside of the image area.

In fact, not only is the 'create line' command very forgiving, but it does automatic line-clipping.

If a line segment is partially beyond the image area, the 'create line' command goes ahead and draws the part of the line that is in the image area.

In other words, I (the programmer) did not have to provide any line-clipping code.

The 'no error thrown' and 'auto line clipping' of the 'create line' command makes me a very happy Tcl-Tk coder.

Thank you to the folks who provided that canvas line drawing code.
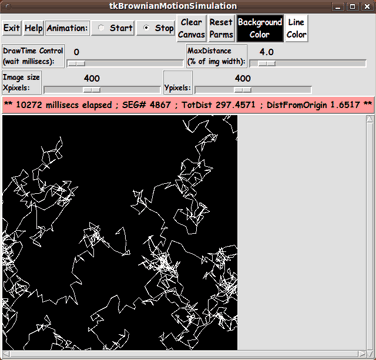
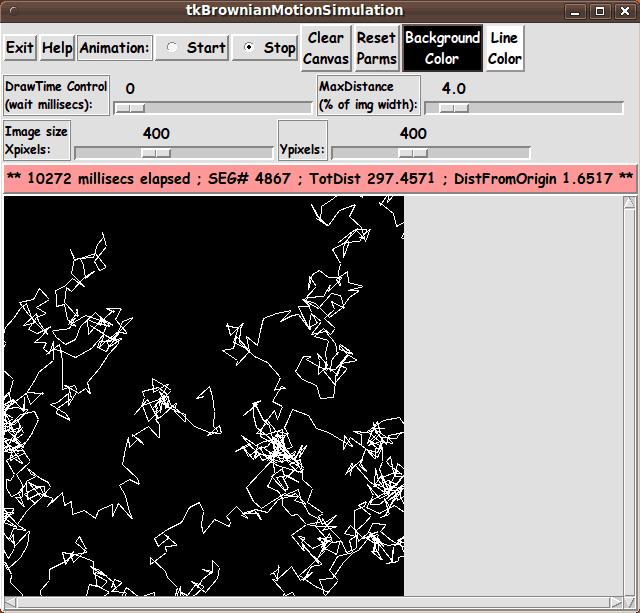
---

The Distance Units

In this GUI, after each line segment is drawn, the message line is updated with

  • the elapsed time of the animation (in milliseconds)
  • the number of the segment just drawn
  • the total distance accumulated so far
  • the current distance from the starting point
    (the center of the image area)

The distance is based on the fact that 'world-coordinates' were 'imposed' on the image area --- providing 'floating-point' coordinates, in addition to the 'integer' pixel coordinates for the Tk canvas image area.

In this implementation, width of the image area is always assumed to be from -1.0 to +1.0 --- in world-coordinates.

The distance to the top and bottom of the image, in 'world-coordinates', is determined according to the aspect-ratio that the user determines for the image --- by setting the Y-pixels scale widget.

For a square image, the top left and right corners of the image area are considered to be at world-coordinate-points (-1.0,+1.0) and (+1.0,+1.0) --- and the bottom left and right corners of the image area are considered to be at world-coordinate-points (-1.0,-1.0) and (+1.0,-1.0).

In this implementation, the animation always starts the imaginary particle in the middle of the image area --- at the origin (0.0,0.0) in world coordinates.

Hence, the 'DistFromOrigin' in the message line refers to the distance from the origin (0.0,0.0) to the end-point of the last line segment drawn.

    (Note that if the simulated particle goes beyond the image area, the 'DistFromOrigin' can be greater than 1 --- and after a large time period, much greater than 1.)

Furthermore, the 'TotDist' is the sum of all the line segment lengths up through the last line segment drawn.

The Pythagorean theorem is used to compute the length of each line segment, by taking the square root of the sum of the squares of the x and y differences of the two end-points, in the 'world coordinates'.

Implementing the Color Buttons

The 2 color buttons call on an 'external' color-selector-GUI script to set those colors.

You can make that color-selector script by cutting-and-pasting the code from the page that offers a non-obfuscated color selector GUI on this site.

You can see the code at the bottom of the Tk script to see how the name and location of the color selector script is set.

---

Drawing Speed
(and implications for a 'visualizer')

When I developed the compute-heavy script that I posted on this site at GUI for Drawing 'Super-ellipses', with nice shaded edges, I learned my lesson (after I posted the script, years earlier, at wiki.tcl.tk) about needing to use braces with 'expr' statements --- for much better execution times.

    (Brent Welch et. al. point this out before page 8 in the 4th edition of 'Practical Programming in Tcl and Tk' --- although they do not follow this advice in many 'expr' examples later in the book.)

The braces made a huge difference in execution speed (in generating images, in this case).

Therefore, in this script (and in all my Tk scripts henceforth), I consistently use braces with ALL 'expr' commands --- in particular, in the compute-intensive 'animate' proc of this Tk script and in the procs that are called by 'animate'.

---

As I noted above, when I set the 'wait time' to zero, this 'app' is capable of drawing hundreds of (colored) line segments per second --- more than 20 in one-twentieth of a second.

This bodes well for making a 'visualizer' (audio or other) by drawing lots of colored line segments on a Tk canvas (although it might have to be a rather crude visualizer until we get faster computers).

In contrast, I found from the Tk script that I posted at Code to Animate Two Sinusoidal Waves Merging that, if I have to generate all the pixels of an image area at each time step of an animation, I will not be able to get 'smooth' animation in 'real time'.

It appears that, in creating a 'visualizer', whether I use

  • the Tk canvas 'create image' technique of the 'Two Sinusoidal Waves Merging' script --- OR

  • the Tk canvas 'create line' technique of this 'Brownian Motion' script --- OR

  • a 'create rectangle' or 'create polygon' or 'create oval' or 'create arc' technique on a Tk canvas

I need to be aware of the number of pixels being added or changed in the image area, in order to achieve a smooth 'real time' animation.


DESCRIPTION OF THE CODE

Below, I provide the Tk script code for this 'Brownian motion animation' 'app'.

I follow my usual 'canonical' structure for Tk code, for this Tk script:


  0) Set general window & widget parms (win-name, win-position,
     win-color-scheme, fonts, widget-geometry-parms, win-size-control).

  1a) Define ALL frames (and sub-frames, if any).
  1b) Pack   ALL frames and sub-frames.

  2) Define & pack all widgets in the frames, frame by frame.
              Within each frame, define ALL the widgets.
              Then pack the widgets.

  3) Define keyboard and mouse/touchpad/touch-sensitive-screen action
     BINDINGS, if needed.

  4) Define PROCS, if needed.

  5) Additional GUI initialization (typically with one or more of
     the procs), if needed.


This Tk coding structure is discussed in more detail on the page A Canonical Structure for Tk Code --- and variations.

This Tk coding structure makes it easy for me to find code sections --- while generating and testing this script, and when looking for code snippets to include in other scripts (code re-use).


Experimenting with the GUI

As in all my scripts that use the 'pack' geometry manager (which is all of my 100-plus Tk scripts, so far), I provide the four main 'pack' parameters --- '-side', '-anchor', '-fill', and '-expand' --- on all the 'pack' commands for the frames and widgets.

I think I have found a good setting of the '-side', '-anchor', '-fill', and '-expand' parameters on the 'pack' commands for the various widgets of this GUI.

In particular ...

The 'canvas' widget will expand/contract appropriately when an image size 'scale' widget value is changed --- and button and label and scale widgets stay fixed in size and relative-location as the window size changes.

If anyone wants to change the way the GUI configures itself as the main window size is changed, they can experiment with the '-side', '-anchor', '-fill', and '-expand' parameters on the 'pack' commands for the various widgets --- to get the widget behavior that they want.

---

Additional experimentation:

You could change the fonts used for the various GUI widgets. For example, you could change '-weight' from 'bold' to 'normal' --- or '-slant' from 'roman' to 'italic'. Or change font families.

In fact, you may NEED to change the font families, because the families I used may not be available on your computer --- and the default font that the 'wish' interpreter chooses may not be very pleasing.

Furthermore, there are variables used to set geometry parameters of widgets --- parameters such as border-widths and padding.

And you could change the '-relief' values for frames and widgets. Feel free to experiment with those 'appearance' parameters as well.


Some features of the code

There are plenty of comments in the code to describe what most of the code-sections are doing.

The most complex code is in the 'animate' proc.

See the comments in that proc to see how it is implemented.

See the top of the 'PROCS' section for a list of the procs used in this Tk script.

See comments in the procs for details on the purpose of each proc and for details on the methods by which each proc was implemented.

Here is a quick overview of the procs --- to give an idea of the 'guts' of this utility:


  - animate                   - called by a button1-release binding
                                on the 'Start' radiobutton.

  - setMappingVars_for_px2wc  - called by proc 'animate'

  - Xwc2px                    - called by proc 'animate'
  - Ywc2px                    - called by proc 'animate'

  - set_scale_Ymax_equal_Xmax - called by button1-release binding on the
                                X-imgsize scale widget

  - set_bkgd_color            - called by the background-color button '-command'

  - set_line_color            - called by the line-color button '-command'

  - update_color_button       - called by the 'set_*_color' procs and once
                                in the 'Additional GUI Initialization section.

  - reset_parms               - called by 'ResetParms' button and in the
                                'Additional GUI Initialization' section,
                                to initialize the parms.

  - clear_canvas              - called by 'ClearCanvas' button

  - advise_user               - called by the 'animate' proc and various bindings
 
  - popup_msgVarWithScroll    - called by 'Help' button


One thing that I discovered in testing a previously-created GUI is a 'trick' to make the GUI (in particular the 'canvas' area) resize nicely after a change to the image-size via the x and y image-size scale widgets.

It turned out that the resizing would not occur after the tester (me) would resize the window by tugging on an edge or corner of the window. The resizing would occur nicely before that 'manual intervention' with the window manager.

It turned out that a Tk 'wm' (window manager) command --- namely

wm geometry . {}

can be used to restore the nice auto-resizing of the canvas area around the image area.

By some searches on wiki.tcl.tk (with terms like 'wm resize'), I found this 'trick' used on the page http://wiki.tcl.tk/10720 (weeEdit) --- in the '-command' of a 'Resize window' button.

In this code, the 'wm geometry . {}' statment was being used to resize a 'text' widget, not a 'canvas' widget.

A search on 'wm geometry . {}' at wiki.tcl.tk revealed that this 'wm statement' was mentioned in a section titled 'word Wrap Via Tk Text Widget' --- on the page http://wiki.tcl.tk/44 (Additional string functions) --- with the comment 'Make sure the toplevel shrinks or expands to fit'.

Thanks to 'D.McC' (David McClamrock) for revealing this technique to me.

I have never seen this 'toplevel shrink/expand' technique --- using 'wm geometry . {}' --- mentioned in the Tcl-Tk books that I have used the most --- the Eric Foster-Johnson books and the Brent Welch books.

But I did find mention of this capability in the original 1994 edition of the John Ousterhout Tcl-Tk book --- on page 237 --- where it says:

    "If you would like to restore a window to its natural size, you can invoke 'wm geometry' with an empty geometry string:

    wm geometry . {}

    "This causes Tk to forget any size specified by the user or by 'wm geometry' so the window returns to its natural size."

Apparently 'wm geometry . {}' can be used to cause Tk to signal the window manager of the operating system to resize the toplevel window according to the widget sizes within the window --- for example, after a user has 'manually' resized the toplevel window by 'tugging' on a window edge or corner.


Comments in the Code

It is my hope that the copious comments in the code might help Tcl-Tk coding 'newbies' get started in making GUI's like this.

Without the comments --- especially in the 'animate' proc --- the code might look even more cryptic than it already is.

Without the comments, potential young Tcler's might be tempted to return to their iPhones and iPads and iPods --- to look for videos of a Minnesota dentist killing an African lion (after paying guides to lure the lion), thus hastening the day that my grandchildren will only be able to see lions in Disney cartoon features and in YouTube videos and old movies.

Please write some Tcl-Tk code, rather than giving any attention to a dentist who seems to be trying to find ways to build up his ego --- even if it means hastening the extinction of most large mammals on this planet other than man (the ones that we don't breed and raise for food or racing).

The dentist will be dead within a couple of decades and the death of that lion will have been for a single ego that is gone and long to be forgotten. What a pointless, cruel, planet-diversity-robbing action on his part.


The Tcl-Tk Script CODE

Here is a link to CODE for the Tk script
'tkBrownianMotionAnimation.tk'.

With your web browser, you can 'right-click' on this link --- and in the menu that pops up, select an item like 'Save Link Target As ...' --- to save this file to your local computer.

Then you can rename the file to remove the '.txt' suffix. Make sure that you have execute permission set on the file --- in order to execute the script.

Some possible FUTURE ENHANCEMENTS

There are quite a few enhancements that could be considered for this script, such as:

  • 1) Write-Ani-GIF:

    It may be good to offer an option to write an animated-GIF file (or movie file) from a sequence of images generated from this animation. It would certainly be more convenient than having to do a bunch of image captures and manually contruct an animated-GIF (or movie) file from a sequence of still-image captures.

    I have implemented a Write-Ani-GIF option in several 'tkGooies' in the 'IMAGEtools' group, such as:

    I can use code from one or more of those Tk scripts to make it relatively easy to implement a Write-Ani-GIF option --- although I might have to do some sort of Postscript to GIF conversion.

  • 2) Different Randomization of Motion:

    I indicated near the top of this page that Einstein gave a quite sophisticated statistical analysis of Brownian motion, whereas I have used a very simple generation of the motion --- using a randomized radius and randomized angle for the generation of each point in the sequence of line-segment end-points.

    In actuality, a 'probability distribution function', like Gaussian or Poisson, for the x,y components of motion of the particle would be much more sophisticated --- and perhaps more accurately predictive of Brownian motion --- than the simple 'flat-and-distance-limited' distribution that I have used.

      (The use of the Tcl 'rand' function is described in the Help text that can be seen by clicking on the 'Help' button of the GUI.)

    The technique that I have used is summarized by the equations

    x(n+1) = x(n) + r * cos(theta)
    y(n+1) = y(n) + r * sin(theta)

      where theta is an angle chosen randomly between 0 and 360 degrees, and where r is a distance chosen randomly between 0 and the max-distance that the user can set.

    A different randomization method might be more appropriate --- for example, using a normal distribution (the classical bell-shaped curve) for the radius, allowing positive and negative values of the radius and an average radius of zero --- if one wants to generate paths that have statistical features that may correspond better to actual Brownian motion as would be seen 'in the field'.

    Furthermore, as I indicated near the top of this page, it would be more appealing to 'the physicist in people' if the GUI provided parameters (such as viscosity and temperature and radius of the particle) by which to control the animation.

    It turns out that there are people who have modelled Brownian motion with a normal distribution --- and using the physical constants that Einstein used in his 1905 paper --- as seen in this PDF file on Simulating Brownian Motion with MATLAB.

    The Tk script on this page could be altered to do the same kind of simulations that are described in that MATLAB document, thus doing them with Tcl-Tk instead of MATLAB.

    It might help to use the Tcl 'nordev' proc that is presented on the Gaussian Distribution page at wiki.tcl.tk.

    The 'flat' kind of distribution that I used in this Tk script is similar to the 'random walk' technique used in this PDF file on Simulation of Brownian Motion with Excel.

    In this document, an even simpler random walk is simulated with equations of the form

    x(n+1) = x(n) + cos(theta)
    y(n+1) = y(n) + sin(theta)

      where theta is an angle chosen randomly between 0 and 360 degrees, and where the 'step-size' is a constant 1 unit (no variable 'r' in these equations).

    In my simulation of random walk motion in this Tk script, I have gone a little further and made the 'step-size' random --- but limited to a maximum distance.

  • 3) Plot the Varying Distance from the Start Point:

    I mentioned above that in the book 'Great Calculations' by Colin Pask, Pask mentions the section "Formula for the Mean Displacement of Suspended Particles" in Einstein's 1905 paper.

    Pask points out that Einstein predicted that, on average, the displacement of the particle from its starting position varies as the square root of time --- whereas for uniform, free motion, the distance varies directly as the time.

    So it could be instructive to add a canvas to this GUI on which a dynamic X-Y plot could displayed showing the 'DistFromOrigin' plotted against the 'SEG#' (line segment sequence number).

    In fact, it could be instructive to not erase the plot after each run and collect a lot of plots to see if they (or their average) seem to conform to the shape of a square root function.

  • 4) 3D (and 1D) motion:

    The Tk script offered on this web page is oriented to simulating 'random walk' motion in 2D.

    We could get more ambitious and simulate such motion in 3D.

    We could write out the 3D point and line (connectivity) data to a Wavefront OBJ file format and use a 3D viewer utility, like the FE 'tkGooies' Tk script at A 3D Model Examiner that reads 3D model files, to view the 3D path from various angles, and zoom in and out.

    In fact, we could get 'less ambitious' and simulate a random walk in 1D --- back and forth along a line.

    In fact, such a simulation is described in the PDF file above on 'Simulation with Excel'.

    John Burkhardt of Florida State--- on a page titled Brownian Motion Simulation in M Dimensions --- has provided Fortran 90 code for doing 1D, 2D, and 3D simulation of Brownian motion.

    An ambitious person could convert this Fortran code to Tcl-Tk code which would put a nice GUI interface on this Fortran program logic and allow the user to vary some of the parameters, such as diffusion coefficient, via widgets on the GUI.

The bottom line here is that there are almost always non-trivial enhancements that could be made to a Tk GUI 'app' like this.

One advantage of this Tk script is that it is 'open' code --- available to anyone for enhancement.

So if you would like to apply an 'Einstein-flavor' to this script, you are welcome to take this code and enhance it.

Personally, I am going to get a copy of Pask's 'Magnificent Principia' and seek inspiration there for more Tk scripts.


IN CONCLUSION

As I have said on several other code-donation pages on this freedomenv.com site and on the Tclers' wiki at wiki.tcl.tk ...

There's a lot to like about a utility that is 'free freedom' --- that is, no-cost and open-source so that you can modify/enhance/fix it without having to wait for someone else to do it for you (which may be never).

A BIG THANK YOU to Ousterhout for starting Tcl-Tk, and a BIG THANK YOU to the Tcl-Tk developers and maintainers who have kept the simply MAH-velous 'wish' interpreter going.

Bottom of this page with
Tcl-Tk Code for a GUI to simulate
Brownian Motion - in an Animation ---
a utility or 'app' in the FE 'tkGooies' system,
in the 'IMAGEanimations' group.

To return to a previously visited web page location, click on the Back button of your web browser a sufficient number of times. OR, use the History-list option of your web browser.
OR ...

< Go to Top of Page, above. >

Page history:

This FE web page was created 2016 Mar 13.

Page was changed 2016 Mar 14.
(Added a couple of items to the 'Possible Future Enhancements' section.)

Page was changed 2016 Mar 15.
(Added a 'Scrollable Canvas' discussion section and a few web links.)

Page was changed 2019 Mar 01.
(Added css and javascript to try to handle text-size for smartphones, esp. in portrait orientation.)

Page was changed 2019 Jun 15.
(Specified image widths in percents to size the images according to width of the browser window.)


NOTE:
This code may someday be posted in a page on the Tcler's Wiki --- wiki.tcl-lang.org --- formerly wiki.tcl.tk. If I do that, I may put a link to the page here.