FE 'xpg'
GUI text-file browser utility


a detailed DESCRIPTION


(FE = Freedom Environment)


Poke this image to see the
xpg 'Other' options line.

Poke off of the image
to change back.

FE Home page > FE Overview page >

This 'xpg' Description page

! 2016 Nov 01 NOTE !
This description is somewhat out-of-date.
The 'shofil.hlp' help file, from the
'2016nov01' release of the FE 'xpg' system,
offers an updated description of 'xpg'.

A HELP GUIDE FOR THE 'xpg' TEXT-BROWSER GUI UTILITY

of the FE (Freedom Environment) system

A utility for rapid

  • viewing

  • searching

  • extracting-and-showing-'match'-lines, and

  • printing

of plain text files (especially, large ones)
on Linux/Unix.

Started: 1999 Jul 19
(for an early version
on SGI-IRIX - Unix)

Updated: 2010 Sep 17
(on Ubuntu Linux)

This HTML file is based on the text file of 'xpg' help in
[xpg-install-dir]/helps/shofil.hlp

That text help file is shown via the
'Help' button on the 'xpg' GUI interface.


TABLE OF CONTENTS

    (links to sections below, on this page

- INTRODUCTION to the 'xpg' utility

- A REPLACEMENT
      for old-style, command-line Text-Viewers
      (cat, more, pg, less)
      --- and for Text-Editors (in which
      a text file might accidentally be changed)

- The 'xpg' SEARCH FACILITY (basic processing features)

- The PRINT FACILITY (how to assign a print command)

- Some SCROLLING/PAGING Facilities

    Mouse scrolling

    • Vertical

    • Horizontal

    Keyboard scrolling

    • 'End' & 'Home' keys

    • 'PageDown' & 'PageUp' keys

    • 'down-arrow' & 'up-arrow' keys

- SOME APPLICATIONS of 'xpg'

- INVOCATION / IMPLEMENTATION METHODS for 'xpg'

  • Via an ALIAS (like 'xpg'), for command-line execution

  • Via RIGHT-CLICK-ON-TEXT-FILE in Nautilus

  • Via Nautilus 'Open With' menu of apps

  • Via RIGHT-CLICK-ON-ONE-OR-MORE-TEXT-FILE(S) in Nautilus
    --- to start an appropriate 'start-xpg' Nautilus script

  • By DESK-TOP ICON

  • Within applications (especially within scripts)

- ADDITONAL FEATURES of 'xpg'

  • Three 'Search (again)' options - Backward, CaseSense, RegExp.

  • Two 'Show All Matches' (SAM) options - CaseSense, NOT

  • The 'Colors', 'TxtFont', and 'EditVars' buttons

  • user-notifications as a big file is read (loaded) into the xpg GUI

  • single click highlight of ENTIRE full-filenames (for quick paste)

- A BRIEF LOOK BACK (an overview)


The 'xpg' utility showing a config file.

Page 2

INTRODUCTION to the 'xpg' utility:

The 'xpg' utility is a 'Show-Text-File' utility that provides a GUI (Graphical User Interface) for SHOWING and/or SEARCHING and/or EXTRACTING-'Match-Lines'-FROM and/or PRINTING a plain text file.

For example, the 'xpg' utility is used to show a text-file version of this HTML Help document when the Help button on the 'xpg' GUI is clicked.

Hence, you can use the 'Search' and 'Extract-Matching-Lines' (plus or minus N lines) features of 'xpg' to examine (look for specific content in) that Help document.


The 'xpg' utility is implemented via a Tcl-Tk script called 'shofil.tk', which presents the GUI interface --- with 'widgets' such as buttons, entry-fields, and labels --- as well as the main text-area widget.

Hence, we may sometimes refer to this utility as 'shofil.tk' or simply 'shofil'.


This utility was devised as a more modern, X-windows version of the Unix 'pg' command (and the Unix/Linux 'more' and 'less' commands).

Those utilities allowed for some rather crude page-forward and page-backward capabilities within terminal (command-line) windows --- and some relatively crude search capabilities.

Since this 'xpg' utility was devised as a vast improvement over the 'pg' command that was available on some Unix systems, this utility was named 'xpg'.

    [To give credit to its Tcl-Tk foundation, 'xpg' could have been called 'tkpg' --- but 'xpg' is a simpler, more streamlined name --- with one less character to type.]

The 'xpg' utility can be invoked by typing the command

    xpg <text-filename>

at a Linux/Unix shell prompt, on essentially any Linux/Unix workstation on which the FE system installs.

If the 'xpg' does not work (is 'not found'), one can define an 'alias', as described in the 'Implementation' section below.

That section describes some implementation methods that allow for start up with a few mouse clicks (or via drag-and-drop) --- no keyboarding required.

Page 3

REPLACEMENT FOR OLD TEXT-TERMINAL VIEWERS (or for TEXT EDITORS)

The 'xpg' utility functions as an X-windows version of the show-text-in-shell-window Unix utility 'pg' -- or its cousins 'cat', 'more', and 'less'.

In other words, 'xpg' is meant to provide a more modern, GUI-interface way to present a text file to a user for browsing --- more modern than the old utilities like 'pg' or an editor utility like 'view' ('vi' with the read-only flag set).

Editor-based viewing utilities, even GUI-style editors like 'gedit' or 'kate' or 'nedit', have the disadvantage that the user can turn off the read-only switch --- if they even have a read-only switch. ('nedit' does.)

So the 'xpg' utility, not having editor capabilities, offers a SAFE way of viewing text files --- making it impossible to accidentally alter the text being viewed.


The 'xpg' GUI is nicer than 'pg' for paging & searching -- and presents a simple interface to a few basic functions. Examples:

  • 'xpg' allows the user to use a SCROLLBAR for PAGING,
  • 'xpg' has a 'Search(again)' BUTTON and ENTRY-FIELD for the standard 'keyword' search function,

! AND ! , 'xpg' has a unique facility :

  • 'xpg' has a 'Show All Matches' BUTTON that gathers all the lines in the text file that include the 'keyword' or phrase in the ENTRY-FIELD --- and shows those match lines, clustered together, in a new instance of the 'xpg' window.

This ShowAllMatches facility even has a 'Plus-or-Minus-N-lines' capability!

This 'ShowAllMatches' feature can be highly useful to Linux/Unix system administrators and to application developers --- as well as to general Linux users.


'xpg' also presents a 'Colors' button so that the user can quickly choose a background color for the GUI --- a light-background (with dark-text automatically set) or a dark-background (with light-text automatically set).

This allows the user to quickly adjust to lighting conditions (or visual disabilities) --- with a background color of his/her own choice.

Or the user may wish to use this color capability when they have several documents opened with 'xpg'. They can color-code each window to quickly identify the nature of each window.

No doubt users can find other uses for this 'Colors' option --- if only to make the 'xpg' window nicer for screenshots.


The 'xpg' utility has a built-in print capability that is easily set and easily used. The print options in some of the older text editors were not implemented in a user-friendly way --- or they were frustratingly inflexible.


The 'xpg' GUI after the 'Other' button is clicked.
Note the added 'Search (again)' option 'checkbuttons'
--- Backward, CaseSense, RegExp ---
and the 'Colors' and 'TxtFont' buttons.

Page 4

THE 'xpg' SEARCH FACILITY (BASIC PROCESSING FEATURES)

At the top of the 'xpg' GUI is an entry field into which you can key (or paste) a string of characters to search for. Then click on the 'Search (again)' button to initiate the search.

By default, 'Search (again)' looks for either lower-case or upper-case matches of the string entered by the user. However a 'Case-sensitive' checkbutton is available, as described near the bottom of this guide, in an 'Additional Features' section.

By default, the search of text in the text-widget of the 'xpg' GUI goes 'forward'. But a 'Backward' checkbutton is available to allow changing the search direction. See the 'Additional Features' section.

    [Note that the 'Show All Matches' button, described more fully below, can almost eliminate the need for 'Backward' search.]

By default, the 'Search (again)' search is a simple 'direct match'. But there there is a 'RegExp' checkbutton that allows for changing the Search to allow regular-expressions in the search entry-field. See the 'Additional Features' section.

A simple 'RegExp' example would be to search for '^$', which would find 'empty' ('null') lines in the text file. That is, it searches for those lines that contain nothing but a line-feed character (which is not shown in most text viewers and editors --- other than hex editors).

Even more options could be provided, than those in the current version, but the current intent is to keep the GUI relatively simple and provide the 'pg'-like text-browsing capabilities that would satisfy text-file browsing needs in 98% of use instances (not necessarily 100% of the world's or universe's use instances).

Setting 'Search (again)' Start Point:

The user can reset the starting point of the search-forward feature at any time after a search is started -- by scrolling to a text area and clicking mouse-button-1 on the character location at which to re-start the search.

Then click on the 'Search (again)' button.

To check on the location of the cursor after clicking mouse-button-1 on a character location (or at any time), you can press mouse-button-2 (the middle mouse button).

A popup message will indicate the line number (and column number) of the 'current search-start location'.

The No (More) Matches Indicator:

After pressing the 'Search (again)' button, when no more matches are found (or no matches at all are found), a 'No Match' pop-up message appears. It shows a count of the matches found --- and the line and column numbers of the last match.

The next time you click the 'Search (again)' button --- typically after changing the text string/phrase in the search field entry widget --- that new text string search will start at the top of the text --- because that is where a person usually wants the search to start.

If that is not the case, the user can relocate the search so that it starts lower in the file, with a simple mouse-button-1 click, at any time after clicking the Search button, as described above.

Page 5

The 'xpg' 'Show All Matches' button:

The 'xpg' GUI has a (unique) 'Show All Matches' button that provides a 'batch search' capability --- and a multiple-strings search capability.

For a given search string, by clicking on the 'Show All Matches' button instead of clicking on the 'Search (again)' button, all the matching lines within the text file are found in one search.

The 'batch' of matches is shown in a popup window --- which is another instance of the 'xpg' GUI.

In other words, the 'xpg' utility uses itself to show the lines extracted by the 'Show All Matches' function.

    NOTE on 'AND' and 'OR' searches:

    You can use the feature of 'xpg' showing its string-matches in another 'xpg' window to advantage --- to look for matches of a different string, among the currently shown matches. This is an 'AND' search, as opposed to an 'OR' search. An 'OR' search can be done using the vertical bar character ( | ) as described below, in a section on 'searching for multiple strings'.

    An example of a combined 'OR-then-AND' search is described in the 'NOTE on seaching for multiple-strings' section, below.


By default, the 'Show All Matches' (SAM) search is case-INsenstive --- and it is an 'exact' search, not a 'regular expression' search.

    (A 'CaseSense' checkbutton is available to make the SAM-search case sensitive.

    In addition, there is a 'NOT' button, to make the SAM-search show the opposite of the match lines.

    These buttons are described a little more in an 'Additonal Features' section near the bottom of this help file.)


The 'Show All Matches' function is modified by an option-menu button that allows you to show lines around the match lines --- plus-or-minus N lines where N may be integers like 0, 1, 2, 3, 4, 5, 6, 8, 10, 15, 25.

If you use N = 0 (zero), the popup window shows only the 'match lines', and no neighboring lines.

    NOTE on showing lines BELOW (and ABOVE) matches:

    The 'N' in the plus-or-minus-N-lines option menu serves a double-purpose. It can be used for 'Show All Matches' --- but it is also used to control the number of lines seen around a match as you step through matches found with the ** 'Search (again)' ** button. The main utility of this is so that a 'Search (again)' match that is high-lighted near the top or bottom of the text display area has some surrounding lines visible.

    For example, with N=3, when a match is found (high-lighted) NEAR THE BOTTOM OF THE DISPLAY, when you use the 'Search (again)' button, the 3 lines BELOW the match (if any) will show in the text-widget of the 'xpg' window.

    If you want more lines to show below (or above) the match, you can set N=10, say, and perform the search again.

    [If you have N=0, at least one line will show below (or above) a match found with 'Search (again)'. The fact that the search facilities of most applications, like text editors, do not do this has been frustrating to the author. He did not want the 'xpg' utility to behave like that.]

Page 6

A NOTE on seaching for multiple-strings ---
** using the vertical bar character ** :

With the 'Show All Matches' button, you can search for one or more strings in lines of a file. This is like the Unix 'egrep' (extended grep) command.

You can give 'egrep' the string 'fatal|error|fail|warning', where the sub-strings are separated by the 'vertical-bar' character. For a given text file, 'egrep' will show the lines that contain matches to AT LEAST ONE of the strings.

This is an 'OR' relationship --- finding any one of 'fatal', 'error', 'fail', OR 'warning' in a line. 'Show All Matches' does the same thing as 'egrep', and more.

    The '|' character is 'shift-back-slash' on most keyboards. It may be represented by a *split* vertical-bar symbol on the key.

'xpg' goes beyond 'egrep'. The 'Show All Matches' function will NOT ONLY show the lines containing any of the multiple strings, but it can ALSO show plus-or-minus N lines around those lines.

In fact, to the author's thinking, the 'ShowAllMatches' button is like a 'eegrep' -- an extended 'egrep' --- or an extended, extended 'grep'.

For example: A 'fatal|error|fail|warning' search, plus-or-minus-N-lines, can be useful on a huge text file like a log file that includes many kinds of error messages.

The extra lines will normally be needed to see other message lines that might explain the error lines found.


Here is an example of a handy 'OR' search with 'xpg' --- combined with an 'AND' search.

Let us say you are in a big company with licensed software in use. There is an application which generates a license checkout log file. The log file has lines that contain 'out:' indicating a license checkout, and lines that contain 'in:' indicating a license check-in --- for various 'features' of the application. The feature name is in the check-out and check-in lines. Also, there is a userid in these check-out and check-in lines.

There are no dates in the 'out:' and 'in:' lines, but there are occasional 'timestamp' lines that give a date and time, say every 4 hours of the day.

Our task: We want to see the 'checkout' records for a particular userid, along with date-time info. So ...

We bring up the license log file in 'xpg'. First, we can use the 'Show All Matches' button with the search string 'out:|timestamp', with N=0.

This will show all the license 'features' that were checked-out during the time-period of the log file --- along with the 'TIMESTAMP' records that give the date-stamps that let you know on which days the check-outs occurred.

Let us say the userid of interest is 'abc00'. So we can do another 'Show All Matches' search --- ON THE PREVIOUS RESULTS --- using the string 'abc00|timestamp', with N=0.

This will filter out all the 'out:' lines that are associated with users other than 'abc00'.

So now we see all the license 'features' that 'abc00' checked-out during the time-period of the log file --- along with the 'TIMESTAMP' records that give the date-stamps that let you know on which days the 'abc00' check-outs occurred.

Even if the log file is quite a few Megabytes in size, these queries proceed very quickly.


This example should give you an 'inkling' of the information-revealing power of these multi-stage, OR-and-then-AND 'Show All Matches' searches --- which can be performed with a few mouse-clicks and keystrokes.

Page 7

A NOTE on seaching for special characters:

An earlier version of the 'Show All Matches' facility required you to use additional 'escape' characters to show all occurences of a special character --- like '(' or '['.

Some special characters --- like '(' and '[' --- would yield no matches with the 'Show All Matches' button --- even when there were such characters in the text file.

You had to handle special character searches --- with the 'Show All Matches' button --- by putting two or three back-slash characters in front of the special character, like

    \\$ or \\[

or

    \\\$ or \\\[

But that is no longer necessary.

NOW you can enter the single character for special characters like parentheses, brackets, braces, etc.:

    ( ) [ ] { } < >

In fact, you can try it out on this help file. Try a 'ShowAllMatches' with any one of those special characters. (I'll stand in the background, crossing my fingers, while you try it.)

Some other special characters to try with 'Show All Matches'.

    ~ ` @ # $ % ^ & * _ - + = | : ; " ' , . ? /

    The 'Search (again)' button will show special-character matches. It uses the text-widget 'search -exact' function of Tk scripts, whereas the 'Show All Matches' button uses a search technique based on the pattern matching capabilities of the 'awk' report formatting program. There MAY be cases where the two search buttons return slightly different results. Effort could be expended to make the two buttons work more similarly, but where is the pay-back --- and, besides, "vive la difference".

There are cases of searches involving the back-slash (\) character where you may need to put double-back-slash (\\) in place of a single back-slash character. This is because of the special function of back-slash as an 'escape' character --- to indicate special characters that should be treated as a character and not as a special command or indicator.

Page 8

The 'xpg' 'Clear' button (for the search-string entry box):

Users will frequently find it helpful to paste a string into the 'search string' entry field --- from text in the 'xpg' text window OR from text in another window on the desktop. But a string may be in the entry field, from a previous search.

It can be inconvenient and inefficient to delete the string --- by MB1-stroke-highlight and hitting the Delete or Backspace key --- or by MB1-locating the insertion cursor in the search entry field and repeatedly hitting or holding the Delete and/or Backspace keys.

Rather, it is more efficient to click on the 'Clear' button and then continue with the text-paste operation.

    (A text-paste operation, from-and-to X-windows, can be performed by swiping, i.e. high-lighting, a string of text with MB1 held down. Then establish an insertion cursor with a poke of MB1 in the location where you want the captured text to begin inserting. Then drop, i.e. paste, the text by a click of MB2. This can be called an MB1-MB2 copy-and-paste or copy-and-drop operation.)

MB1 = mouse button 1 ; MB2 = mouse button 2


Restoring the Search-string field : (un-do for 'Clear')

If you MB1-click on 'Clear' and realize that you want back the string that was in the entry field, MB1-click on 'Clear' again. The string will be restored.

I.e. there is a one-step un-do capability built into the 'Clear' button. One click clears the entry field --- a second click restores the contents of the entry field.

Page 9

The 'xpg' PRINT FACILITY --- how to specify a print command

Th 'xpg' utility includes a Print button that starts up a printer command with the name of the text file that the user is browsing as an input parameter to that print command.

The 'xpg' subsystem of the FE (Freedom Environment) system uses a set of Tk 'include' files to set Tcl-Tk variables for various purposes.

Rather than putting all the Tcl-Tk environment variables that the user might want to tailor in one big file, we break the '.tki' files (the Tk Include files) into several categories, including:

  • set_widget_apps.tki

  • set_widget_colors.tki

  • set_widget_fonts.tki

A variable named 'fePRINTcmd' is in the 'apps' '.tki' file.

Here is an example of the part of that file that sets that variable. The lines that start with '#' are comment lines (to the Tcl-Tk 'wish' window-shell interpreter).

So you can see below that quite a few example print commands are provided --- that can be de-commented and commented as the user pleases.


## The user's Favored print command.
##     (The user does not provide the input filename for
##      this command. A filename will be supplied by an
##      FE system utility, which is usually a Tcl-Tk
##      script, such as 'shofil.tk'.)
##
#   set fePRINTcmd "kprinter"
#   set fePRINTcmd "cupsdoprint -P lp1 -H localhost:631"
    set fePRINTcmd "hp-print"
##
## NOTE: The lpr and lp commands do not give much control
##       over font sizes, styles, margins, etc.  So the
##       following commands are probably not going to satisfy.
#   set fePRINTcmd "lpr -P lp1 -h"
#   set fePRINTcmd "lp -d lp1 -o cpi=12 -o lpi=8 -o page-left=72"


The user edits the 'set_widget_apps.tki' file to set the print command wanted. This setting, normally, will stay the same for months and months and months.

The '.tki' files are in the directory $FEDIR/includes_tk, where $FEDIR represents the install directory of the 'xpg' FE subsystem.

The default (and recommended) install directory is

    FEDIR=$HOME/apps/feXpg_yyyymmmdd

where yyyymmmdd is a release date, like 2010sep17.

But you do not have to remember the location of the '.tki' files. You can quickly edit the '.tki' files via an 'EditVars' button on the 'xpg' GUI. The 'EditVars' button is described in an 'Additional Features' section near the bottom of this help file.


The author currently (2010aug) is using the 'hp-print' command. But, like many such print utilities on Unix/Linux, they often use filters that keep you from printing out even the most basic types of text files.

For example, 'hp-print' does not seem to like my '.tk' script files. 'hp-print' pops up a message that says it is not going to print such a file (but not telling me what criteria it is using to make that judgment). I might be able to fool it by adding a '.txt' suffix to the file, but I should not have to do things like that.

Another FE utility planned for future release is the 'xlphp' print command, indicated in a 'set fePRINTcmd' line above. 'xlphp' does not have annoying filters like HPLIP and CUPS print systems have. 'xlphp' will basically print out any file that is not a binary file.

Whether a file is binary could be indicated by the output of the Linux/Unix 'file' command. In any case, the user could be given a warning message and then allowed to send the data stream to the printer if he wants to risk dealing with the consequences.

I will probably switch from 'hp-print' to 'xlphp' when I get that utility up and running.

Page 10

SOME 'xpg' SCROLLING/PAGING FACILITIES

Mouse scrolling:

    The 'xpg' GUI offers a y-scrollbar (vertical scrollbar), to allow for rapid vertical scrolling through the text.

    There is a button labelled '<-Ybar->' that can be clicked to rapidly toggle (move) the vertical scrollbar between right and left sides of the GUI.

    At the bottom of the GUI, there is also an x-scrollbar (horizontal scrollbar) to allow for scrolling to see the ends of very long lines of text.

Keyboard scrolling:

    In addition to mouse scrolling, with the vertical & horizontal scrollbar buttons, there are some keyboard controls for vertical navigation.

    The 'End' and 'Home' keys, when struck, pop the text display to the bottom or top of the text, respectively.

    The 'PageDown' and 'PageUp' keys allow for paging 'forward' and 'backward'.

    And the 'down-arrow' and 'up-arrow' keys allow for 'advancing' or 'retreating' a line at a time. Hold those keys down and you travel 'at a gallop' through the text file.

    These 'keyboard-scrolling' functions can be very useful on huge text files where 'mouse-scrolling' is too sensitive. The 'keyboard-scrolling' allows for 'fine-tuned-scrolling'.


SOME APPLICATIONS of 'xpg' :

The 'xpg' utility was meant to be used to display the many text-file helps in the FE (Freedom Environment) system.

'xpg' was also meant as a means for Unix/Linux application supporters and developers (as well as 'Unix/Linux system administrators') to quickly browse/search/print text files, scripts, configuration files, message logs, lists of files or directories, license log files, etc.

And engineers, physicists, chemists, and others could use 'xpg' to browse large (or even huge) files of scientific, financial, or other data --- such as data from CAE (Computer Aided Engineering) simulations, satellite collection data, weather data, stock price data, etc. etc. etc.

They can use the 'xpg' utility 'stand-alone' (outside of any application or script) --- to browse/search/print plain text files.

Any Unix/Linux application at a site could use the 'xpg' script to present a text file to users, in a scrolling mode, via the 'xpg' GUI. For example, it would be easy to code a call to an 'xpg' command in shell scripts of an application.

See the 'Implementation' section below.

Page 11

INVOCATION/IMPLEMENTATION of 'xpg' :

'xpg' IMPLEMENTATION VIA an 'alias', for command-line execution

If the site 'xpg' command does not work for you at the command line of a terminal window (you get a message like "sh: xpg: not found"), you can make an alias, like 'xpg', for the script that starts up the 'xpg' text-browser window, by putting the following alias

alias xpg="$XPGINSTALL/scripts/xpg"

in your shell tailoring file --- typically $HOME/.bashrc --- or in Ubuntu 9.10, $HOME/.bash_aliases was provided as a nice separate file to hold aliases.

    [$XPGINSTALL represents the install directory of the 'xpg' subsystem of the FE system. It is recommended that an 'apps' directory in your home directory be used, and install the 'xpg' system in a subdirectory of 'apps', such as $HOME/apps/feXpg_yyyymmmdd.

    In that case, the alias above could be written as

    alias xpg="$HOME/apps/feXpg_yyyymmmdd/scripts/xpg"

    for example

    alias xpg="$HOME/apps/feXpg_2010aug27/scripts/xpg"

    Note that putting the installation in your home directory is a good strategy, because when many people do their Linux OS upgrade, they preserve their home directory, while directories such as /usr get wiped out and replaced. I.e. you don't have to re-install 'xpg' after doing an operating system upgrade, if you preserve your home directory.]

You can log off and log on to make the alias available to ALL terminal windows in your session.

Then, at a shell prompt in a terminal window, type 'xpg' followed by a filename, and press Enter.

    NOTE: The shell script $FEDIR/scripts/xpg calls the Tcl-Tk script $FEDIR/tkGUIs/shofil.tk. The main difference between calling on the 'shofil.tk' script and calling on the 'xpg' script is that the 'xpg' script includes some code allowing for starting up 'xpg' on several different files, if you pass several filenames to 'xpg'.

    In fact, 'xpg' protects you from accidentally starting up too many 'xpg' GUI windows, by limiting the number of filenames accepted to 8. Of course, the user could easily change that limit by changing one number in the 'xpg' script.

'xpg' runs as a 'background' process, making available the command-interpreter in the window in which the 'xpg' command was issued.

    The author gets frustrated when failing to remember to put an ampersand (&) after the command to start an application like a text editor. The terminal is 'tied up' until exiting the application. No such frustration with 'xpg'. By default, it supplies the ampersand.

If you want to start 'xpg' as a 'foreground' process, you can use the '-f' option. Example:

xpg -f

Type 'xpg' with no filename to see some brief syntax help.

Page 12

'xpg' IMPLEMENTATION Via RIGHT-CLICK-ON-TEXT-FILE in Nautilus

You can simply add 'xpg' as the default application to use on a large number of text-type files, via your file manager, such as Nautilus.

In Nautilus, right click on an appropriate type of file and choose 'Properties'. Go to the 'Open With' panel on the 'Properties' options window, and 'Add' 'xpg' by browsing to the script named 'xpg' in the install directory.

'xpg' IMPLEMENTATION Via in Nautilus 'Open With' menu of apps

In Nautilus, you can add 'xpg' to the 'Open with' list of applications. You see that list when you right click on essentially any text file and put your mouse cursor over 'Open With' on the Nautilus popup menu.

You can use the 'Other Application...' option at the bottom of that list, to add 'xpg' to the list by browsing to the script named 'xpg' in the install directory.

'xpg' IMPLEMENTATION Via RIGHT-CLICK-ON-ONE-OR-MORE-TEXT-FILE(S) in Nautilus
--- to start an appropriate Nautilus script

You can use a Nautilus script to browse files with 'xpg'.

The script would simply accept a filename passed to the script and then issue the 'xpg' command on the filename.

After you put such a script in the 'hidden' directory

    '.gnome2/nautilus-scripts'

in your home directory, you can then navigate to any text file via the Nautilus file manager. Then select one or more text files and right-click on a high-lighted text file name. Move the mouse cursor to the 'Scripts >' option near the bottom of the Nautilus popup window. Then slide the mouse cursor over to your script and click on its name, which might be '00_show_fil_with_XPG.sh', for example.

The files will be shown in one or more instances of 'xpg'.

Here is sample code for such a script:


#!/bin/sh
##
## Nautilus
## SCRIPT: 00_show_fil_with_XPG.sh
##
## PURPOSE:
## Shows selected file(s) [in a directory] using
## the Tcl-Tk utility 'xpg' of the FE
## (Freedom Environment) system.
##
## HOW TO USE:
## In Nautilus, navigate to a file(s), select
## it/them, right-click and choose this
## Nautilus script to run.
##
## Created: 2010apr11
## Changed: 

## FOR TESTING:
# set -v
# set -x

###########################################
## Get the filename(s).
###########################################

  FILENAMES="$@"
# FILENAME="$1"
# FILENAMES="$NAUTILUS_SCRIPT_SELECTED_FILE_PATHS"
# FILENAMES="$NAUTILUS_SCRIPT_SELECTED_URIS"


#############################################
## Show the file(s).
##
## NOTE: The xpg wrapper script is written to
##       show up to 8 files, max.
##       Of course, that max is easily changed.
#############################################
## You may need to change the date in the
## 'feXpg' directory name, if you are dealing
## with a different release.
#############################################

XPG="$HOME/apps/feXpg_2010aug27/scripts/xpg"

$XPG  "$FILENAMES"


Note that you can select multiple files to feed to the 'xpg' command of this Nautilus script by using the 'Ctrl' or 'Shift' keys along with mouse clicks.

Page 13

'xpg' IMPLEMENTATION BY DESK-TOP ICON

You can make the 'xpg' utility/command an icon on your desktop in the usual way for your desktop environment (say KDE or Gnome).

Gnome:

    For Gnome, you can right-click on the desktop and choose 'Create Launcher ...'.

    In the 'Create Launcher' window that pops up, in the 'Name:' field enter a name like 'xpg', and in the 'Command:' field, enter the name $HOME/apps/feXpg_2010sep17/scripts/xpg, if you used the default install location for the 'xpg' system.

      NOTE:
      You may have to change the date in the 'feXpg' directory name, if you are dealing with a different release.

    To avoid keying in that fully-qualified filename, you can browse to the script in the install directory and simply click on its name.

    Then click 'OK'. (If you want to use a different icon from the standard Gnome launcher icon --- a platform on a spring --- click on that launcher icon in the upper left of the 'Create Launcher' window and choose a different icon, before you press OK.)

KDE:

    For KDE, you can right-click on the desktop and choose CreateNew -> Link to Application. In the 'General' panel that pops up, fill in a short name for your application icon. (You can click on the default gear-icon in the panel, and choose a different icon from a large array of icons.)

    Then click on the 'Application' panel and click on the 'Browse' button to find the 'xpg' script you want to associate with the icon.

    In the case of the 'xpg' script, let us assume that the 'xpg' FE subsystem is installed in the default/recommended directory, FEDIR=$HOME/apps/feXpg_yyyymmmdd. Then, for KDE, you can use the 'Browse' button mentioned above, to navigate to

      $HOME/apps/feXpg_yyyymmmdd/scripts

    to find (click on) "xpg".

    yyyymmmdd represents a release date.
    Example: 2010sep17

After you have your desktop icon:

    You can drag icons representing text files onto the 'xpg' icon --- for browsing, searching, and/or printing.

(Since the 'xpg' script requires an input file, you will have to drag a file icon/name onto the desktop icon for the script to show the GUI. If you simply double-click on the icon, probably nothing will appear --- although a utility like 'zenity' could be used to pop up a message window when the script is started with no filename supplied.)


'xpg' IMPLEMENTATION WITHIN APPLICATIONS (SCRIPTS)

The 'xpg' GUI is generated by a Tcl-Tk script 'shofil.tk' (in $FEDIR/tkGUIs). This Tcl-Tk script can be called from within a Unix shell script or a Tcl-Tk script.

Since the Tcl-Tk 'wish' (window shell) interpreter is available on most Linux desktop/laptop/server distributions, the 'shofil.tk' Tcl-Tk script can be implemented in any shell or Tcl-Tk script that runs on such a Linux machine.

You can look at the 'xpg' shell script for an example of calling 'shofil.tk' from within a shell script. That's the main part of the 'xpg' script.

    The 'xpg' script is located at '$FEDIR/scripts/xpg' where FEDIR denotes the install directory of the 'xpg' system. By default (and recommendation), that directory is typically $HOME/apps/feXpg_yyyymmmdd, where yyyymmmdd is a date like 2010sep17.

You can look at the 'shofil.tk' Tcl-Tk script for an example of calling 'shofil.tk' from within a Tcl-Tk script --- because 'shofil.tk' calls itself to show the text help file for 'xpg' --- $FEDIR/helps/shofil.hlp.

The calling application would feed the 'shofil.tk' Tcl-Tk script the fully-qualified name of a text file.

The 'shofil.tk' script contains many comment lines describing the input-to & output-from the script -- and describing the call format.

See the '$FEDIR/tkGUIs/shofil.tk' script itself for more information on implementation.


This is the 'xpg' GUI after
the 'Colors' button was used
to change the 'palette' of
the Tk GUI to a dark blue.

Page 14

ADDITONAL FEATURES of 'xpg'

  • Three 'Search (again)' options - Backward, CaseSense, RegExp.

  • Two 'Show All Matches' (SAM) options - CaseSense, NOT

  • The 'Colors', 'TxtFont', and 'EditVars' buttons

  • user-notifications as a big file is read (loaded) into the xpg GUI

  • single click highlight of ENTIRE full-filenames (for quick paste)


THREE 'Search (again)' OPTIONS:

There is an 'Other' button on the top of the GUI. It is a 'toggle' button.

Clicking on the 'Other' button, shows/hides a tool bar that shows three check-buttons --- that can be used to modify the function of the 'Search (again)' button:

  • Backward (changes the search from forward to backward)

  • CaseSense (changes the search from case-INsensitive to case-sensitive)

  • RegExp (turns on regular-expression search, instead of 'exact' search.)

      Then, for example, you can use '^' to indicate the start of a line and '$' to indicate the end of a line.

      And you can use '  *' (space-then-asterisk) to indicate zero or more spaces and '    *' (two-spaces-then-asterisk) to indicate one or more spaces.


Two 'Show All Matches' (SAM) options -
CaseSense -and- NOT :

To the right of the 'Search (again)' checkbuttons on the 'hidden' toolbar, there are two more check-buttons --- that can be used to modify the function of the 'Show All Matches' (SAM) button:

  • CaseSense (changes the SAM-search from case-INsensitive to case-sensitive)

  • NOT (changes the SAM-search FROM extracting the match lines that have a match to at least one of the one-or-more search substrings --- TO extracting the lines that DO NOT have a match to ANY of the search substrings)

There are some examples of how these buttons can be used, in text at the bottom of any of the extract listings.

    NOTE:
    At this time (2010sep), the plus-or-minus-N-lines setting in the GUI has no effect when the 'NOT' button is used in a SAM-search.

    The author has not encountered a case where he really needed to show plus-or-minus N lines on either side of the NOT-a-match extracted lines.


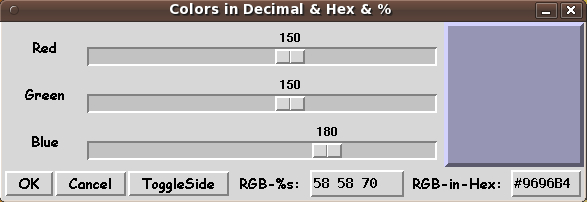
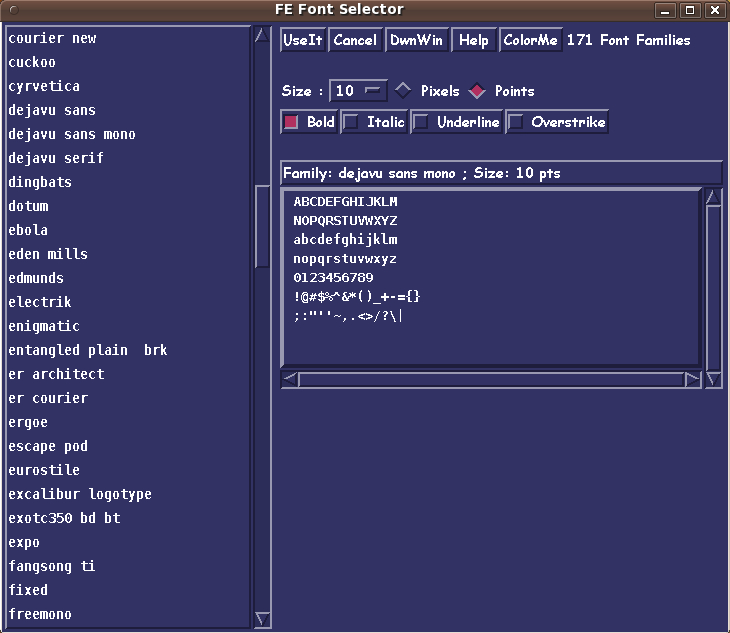
The 'Colors', 'TxtFont', and 'EditVars' buttons :

A 'Colors' button, a 'TxtFont' button, and an 'EditVars' button are on the right end of that 'hidden' toolbar.

Clicking on 'Colors' brings up a 3-slider GUI, for specifying Red, Green, Blue --- for a new color theme for the 'xpg' window.

Clicking on the 'TxtFont' button brings up a 'tk Font Selector' GUI --- allowing for selecting a different font for the main text widget of the 'xpg' GUI.

These Colors and Fonts changes are 'temporary'. They just exist for that instance of the 'xpg' window.

Those changes can be used for experimenting to see what 'permanent' changes to colors or fonts you might want to make. Then the next button comes into play.


The 'EditVars' button :

The 'EditVars' button provides easy access to the several Tk 'include' files that allow you to more 'permanently' change such FE Tk GUI features as:

  • widget fonts, in particular fonts for the Tk button widgets and for the large text-area widget of the 'xpg' GUI

  • widget colors, like the default 'palette' of colors for the 'xpg' GUI --- and the color for the entry field background

  • widget apps, like the print command to be used for printing from the 'xpg' text file browser

  • widget geometry, like x and y internal padding in buttons.


NOTIFICATIONS AS A BIG FILE IS READ:

When 'xpg' reads a LARGE file: After every-so-many-Megabytes, the user is shown how many Meg have been loaded into the text widget of 'xpg' --- and the user is prompted to read 'More', or 'Stop', or 'Exit(Quit,Cancel)'.

SINGLE CLICK HIGHLIGHT OF A STRING in 'xpg':

A SINGLE-MB3-click on a filename, in the text area of an 'xpg' window, selects and highlights the entire filename --- making it easy to paste the FULL name into another window. (MB3 = mouse button 3)

    [In contrast, a DOUBLE-MB1-click on a (full) filename, in almost any X-windows or MS-Windows application, only highlights the text to the first special character to the right and left, like the 'slash' (/) character.

    It takes a shift-MB1 action to 'extend' the selection --- to a starting and/or ending character.]

Use single-click of MB1, then MB2, to do the paste --- into another window, like an 'xterm' or 'gnome-terminal' window.

    (A single MB1 click sets the location of the 'insertion cursor'. A single MB2 click 'drops' selected(highlighted)-text at the location of the 'insertion cursor'.

    At the bottom of the 'man' help for the Tcl-Tk command 'text', there is a description of about 30 functions of mouse buttons and control keys in a 'text' Tk widget.

    These functions are pretty typical in other X-windows, like 'old' editor and 'xterm' windows. The working of the 'Home' and 'End' keys has been changed a little bit in 'xpg'. Instead of those keys showing text to the left and right, they show text at the top and bottom of the file.)

Actually, if you want to paste highlighted text, from 'xpg', into an 'xterm' window, a simple MB2 click (anywhere in the 'xterm' window) will suffice --- to paste the text at the end of current characters on the command-prompt line.

No MB1 action is needed ... since there is only one insertion point in the 'xterm' window.

    [NOTE: This MB3 highlight function in 'xpg' could be easily changed to 'trim' special characters --- like parentheses, quotes, colon, comma, semicolon, question mark --- from the right and/or left end of the highlighting. It remains to be seen whether this is advisable to implement, and for which characters.

    I have in mind here the case of clicking on a filename with left and right parentheses on either side of the name. As the MB3-copy is currently implemented in 'xpg', the parentheses would come along with the filename.

    You can always 'swipe' with MB1 --- press MB1 at the character you want to start copying and release MB1 at the last character you want to copy. So spending a lot of time on a single-click copy that will satisfy everyone is probably time that could be better spent on some other aspect of 'xpg'.]


This is the Color-Selector GUI that
is invoked when the 'Colors' button
on the 'xpg' GUI is clicked.

Page 15

A BRIEF LOOK BACK (an overview)

The really unique and handy feature of 'xpg' is the 'Show All Matches' (SAM) button.

Clicking on that button causes 'xpg' to extract ALL 'match' lines from the text file currently being browsed with 'xpg' --- and show those match-lines in a new instance of 'xpg'.

The 'Show All Matches' search supports looking for multiple strings, if the strings are separated by the vertical-bar character ( | ).

Example search string: search|match|string

If you are reading the text-file Help document of 'xpg' with the 'xpg' utility (via its Help button), you can enter or paste that search string, into the Search-string entry field, and click on the 'Show All Matches' button.

See what comes up. Fast isn't it?


As another example, if you want to see the lines having to do with printing, you could

  • put 'print' in the search field
  • change the plus-or-minus-N-lines value from 0 to 4
  • click on the ShowAllMatches (SAM) button.

This is a REALLY fast way to see what the 'xpg' help file has to say about printing.

Similarly, you can use the search string 'match' and N-lines equal to 4 or 5 to see most of the help about the 'Show All Matches' feature.


Hopefully, system and application administrators, on Linux/Unix systems, will find this 'xpg' utility of help in dealing with

  • big system/application files ... configuration files, log files, etc.

  • lists of many (hundreds of) thousands of files

  • big README files in which you are searching for information on a particular issue, and the ShowAllMatches button will show, in an instant, whether that issue is addressed

  • etc. etc.

The same goes for Engineering users, who typically deal with huge data files generated from CAE and CAD/CAM applications.

Similarly, developers and users of 3D modeling applications may find the 'xpg' utility handy to search/extract-from huge files of geometry and animation data.

Happy text browsing!

END OF GUIDE to the 'xpg'
GUI TEXT
BROWSE / SEARCH/ EXTRACT-MATCHES
utility


Click on this image to see the
Font-Selector GUI in a different color 'palette'
in a separate window or tab.

(Note that changing the 'palette' of a Tk window
changes the color of ALL the widgets.)

This is the Font-Selector GUI that is invoked when
the 'TxtFont' button on the 'xpg' GUI is clicked.

This is to change ONLY the font of the text widget,
NOT the fonts of the button, label, entry, and
other widgets of the 'xpg' GUI.

The Font-Selector GUI, like the 'xpg' GUI, has a
'Color' button, which when clicked invokes the
FE RGB Color-Selector GUI.

NOTE:
These screenshots were taken of Tk GUIs rendered
with Tcl-Tk 8.4. With Tcl-Tk 8.5 comes the
possibility of rendering the Tk window
(in particular, the fonts)
with the 'Xft' anti-aliasing system on Linux.
Much nicer displays of fonts should be possible
with Tcl-Tk 8.5 --- similar to the display quality
seen with Linux font-viewing utilities such as
'gnome-specimen', 'gnome-font-viewer',
and KDE 'fontmatrix'.

For a guide to use of the 'FE Font Selector', see the
web page describing the 'FE Font Selector' utility.

FE Software . . . Making Mole Hills out of Mountains.

Bottom of this
FE 'xpg' utility Description page.

FE = Freedom Environment

The 'xpg' utility offers a unique feature:
a search-string capability that Extracts-and-Shows-All-Matching-Lines --- plus-or-minus N lines.

A nice GUI font selector and a GUI color selector come along with the 'xpg' package.

To return to a previously visited web page, click on the Back button of your web browser a sufficient number of times. OR, use a History-list option of your web browser.
OR ...

< Go to Top of Page, above. >

Page history:

Page was created 2010 Aug 27.

Page was changed 2016 Nov 01.
(Added a link to an updated description of 'xpg' --- at the top of this page.)

Page was changed 2018 Aug 15.
(Added css and javascript to try to handle text-size for smartphones, esp. in portrait orientation.)

Page was changed 2019 Jun 10.
(Specified image widths in percents to size the images according to width of the browser window.)